Do you know that mini heart attack you get when your Mac crashes or would not start? it is the worst feeling in the world, especially if you have a lifetime worth of work stored inside your machine. What should you do in these situations? As you are probably have been advised many times, backing up your data regularly is a great practice. For Mac users, setting up an OS X Recovery Disk would be beneficial when trouble strikes.
What is an OS X Recovery Disk?
The OS X Recovery Disk is a hidden recovery volume on your Mac hard drive. This feature can be used to start up your machine and perform emergency maintenance services such as repairing a corrupted drive by running Disk Utility, surf the internet to assess the problem you might be experiencing or download any necessary updates. You can also use the OS X Recovery Disk to reinstall your operating system.
Part 1 How to make a Mac with OS X Recovery Disk
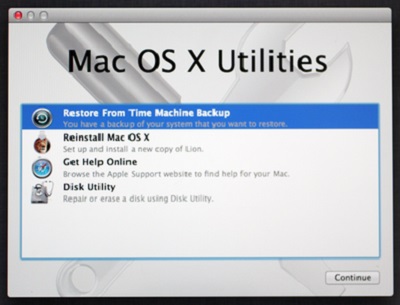
Now that you know that your machine has a built-in recovery tool, you may ask "How to use OS X Recovery Disk?" The feature allows you to do the following options:
- Use Time Machine backup to restore your Mac.
- Reinstall OS X.
- Get help online or check your internet connection.
- Use Disk Utility to verify and repair connected disks.
Here is how to recover Mac with OS X Recovery Disk:
- To put your Mac into Recovery Mode, restart your machine and hold down the Command + R keys on your keyboard simultaneously. Continue to do this until the Apple logo appears.

- When your Mac has started up, the OS X Utilities window will appear and prompt you to choose one of the four options listed above. (Note: if you do not see this, but instead see a login page, you will need to restart your Mac and do the whole process again).
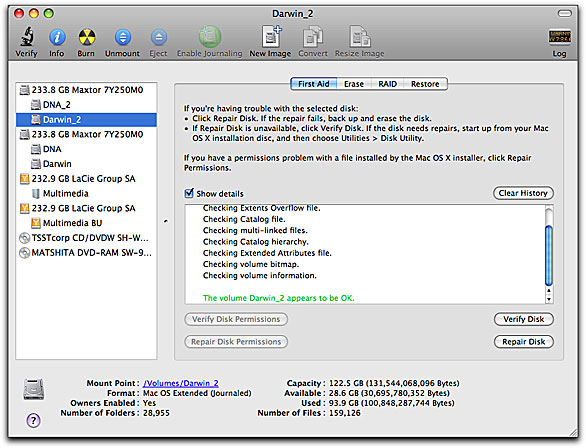
- Click Disk Utility and choose the drive you want to repair on your Mac. Open the First Aid tab. To check the problem your Mac has, click the Verify Disk button. Click the Repair Disk button to start fixing this button.
Part 2 How to create an OS X Recovery Disk
Since OS X Mountain Lion, everything went digital and maintenance-minded Mac users could no longer depend on physical recovery disks to help them fix any problems on their machines. But what how can you access this hidden partition if something goes wrong with your hard drive? You can always connect your machine online and initiate the OS X Internet Recovery feature, but realistically, you may not always have an internet connection. This method will also not work if you had upgraded an old Mac to run on a newer version of OS X.
In these situations, having your OS X Recovery Disk easily accessible on an external USB drive or SD card would be beneficial. It is really simple, read on to learn how to create OS X Recovery Disk that you can easily access anywhere, anytime. Before you start, here are some of the things you need to adhere to:
- To create an OS X Recovery Disk, make sure that your machine is at least running on OS X Lion or Mountain Lion and that there is an existing Recovery System on its startup volume. If you have a newer Mac, use Internet Recovery to get the system online.
- An external US drive or SD card with at least 1GB free space.
Once you have made sure both requirements are duldilled, follow the following steps to create an OS X recovery disk:
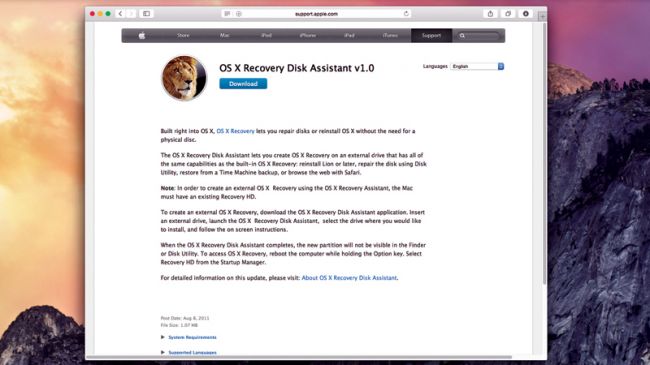
- Download the Recovery Disk Assistant from the Apple website if you do not have it already in your Applications/ Utilities folder.
- Wait until the download is complete and double-click on the file which should be named RecoveryDiskAssistant.dmg. This will create the Recovery Disk Assistant.appfile - drag it into your Applications folder.
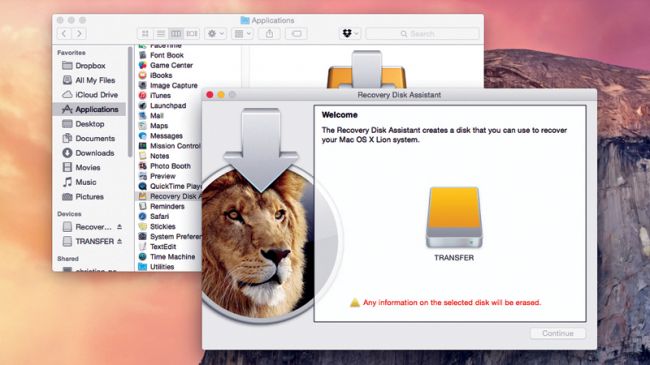
- Attach an external hard drive or USB stick and launch the Recovery Disk Assistant . Agree to the terms and conditions and wait until the software detects your external drive. Select the drive you want to use to create OS X Recovery Disk. Click Continue . (Note: all data in the selected drive will be overwritten so that the wizard can install the needed data to make the external hard drive or USB stick into a recovery disk.)
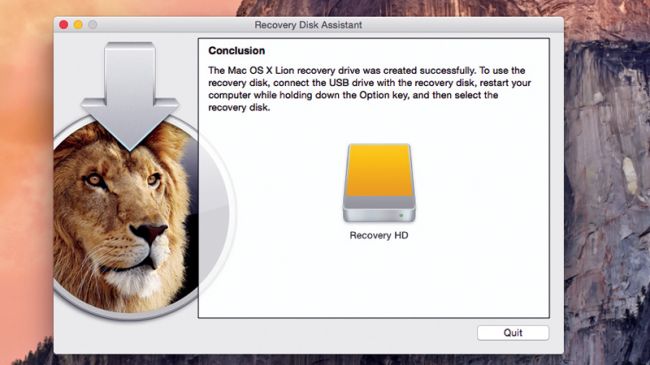
- It will take some time for the process to complete. When the software prompts you that it is done, click on the Quit button. Eject the new recovery disk and keep it in a safe place. You will be able to use the disk when you need it the most. It is also a good idea to update this disk regularly.
Having a built-in recovery solution is great, especially when you tend to lose or misplaced recovery disks. It would be great to learn how to use it and have a copy of it stored outside the machine so that you will be able to access it when you cannot do it straight from your computer.
- Recover lost or deleted files, photos, audio, music, emails from any storage device effectively, safely and completely.
- Supports data recovery from recycle bin, hard drive, memory card, flash drive, digital camera and camcorders.
- Supports to recover data for sudden deletion, formatting, hard drive corruption, virus attack, system crash under different situations.
- Preview before recovery allows you to make a selective recovery.
- Supported OS: Windows 10/8/7/XP/Vista, Mac OS X (Mac OS X 10.6, 10.7 and 10.8, 10.9, 10.10 Yosemite, 10.10, 10.11 El Capitan, 10.12 Sierra) on iMac, MacBook, Mac Pro etc.