- How to Restore your MAC with Time Machine
- How to Restore your MAC with iCloud Services
- How to Restore MAC with Wondershare Data Recovery for Mac
- Video tutorial of Mac Data Recovery
Losing your data while working can be painful, and for the ones who are consistently working on MAC, the idea of losing their important data can be frightening. In the given article, we take up three different methods to restore your MAC. For the ones who have never experienced any loss of data while using their MAC, the knowledge can come in handy. At the end of the article, we take up the Wondershare Data Recovery software which apart from being a wonderful data manager for your device also doubles up as ‘restore’ option. Apart from that, various other methods have also been discussed for the reader’s convenience.
Part 1 How to Restore your MAC with Time Machine?
Time Machine happens to be OS X’s built in Data backup software. The users were first acquainted with this feature in OS X 10.5 Leopard, and it has been helpful for users since then. For the ones who are not aware of this tool, it happens to be one of the most basic tools to restore your MAC and can assist you to recover individual files that you have deleted. Also, it can help restore your entire hard disk in the event of any unforeseen happening.
So, how do we enable Time Machine backup on our MAC? Please note that this step is crucial if one wishes to restore their MAC.
1) You start with selecting System Preferences from the Apple Menu.
2) Select the Time Machine icon.
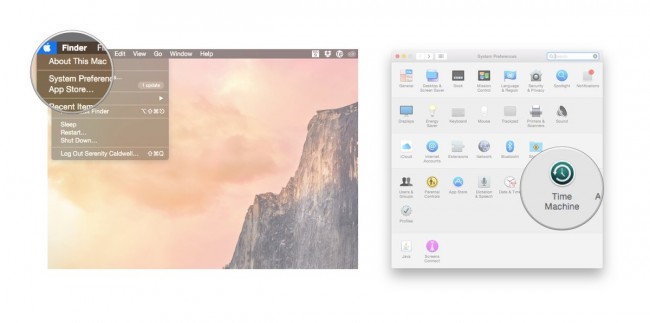
3) Simply turn the Time Machine slider ‘On’.
4) The next step has you clicking ‘Select Backup Disk’ to choose the disk you would want to use as the Time Machine Backup.

5) This will lead to the Time Machine formatting the hard drive for backups and will initiate your first backup within a couple of minutes.
The final step is to restore the files from the Time Machine backup, steps for which have been listed below.
1) From the given Apple Menu, you have to select ‘System Preferences’, and then select the ‘Time Machine’ icon.
2) The next step has you selecting the ‘Show Time Machine in menu bar’ checkbox.
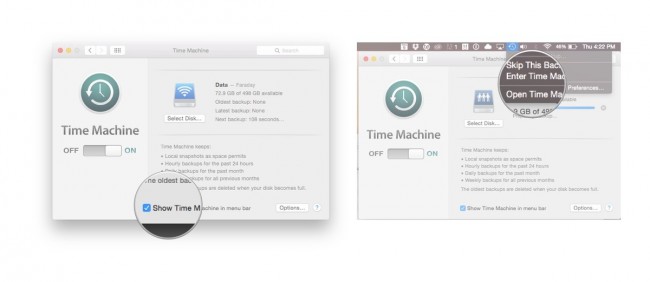
3) Select ‘Enter Time Machine’ from the Time Machine menu.
4) The users would be guided to the Time Machine window from where they can navigate to the file or folder they wish to restore.
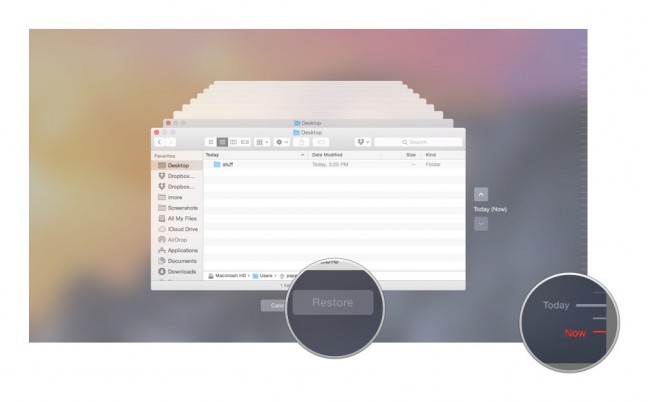
5) Once the specific file or folder has been found, the ‘Restore’ button can be clicked. This will enable Time Machine to copy that file back to its original location on the hard disk.
Part 2 How to Restore your MAC with iCloud Services?
For every Apple user, iCloud happens to be a savior in more than one case. The iCloud offers the luxury to users to recover their data, and thus, restore their device. Some of the data types get automatically uploaded to your iCloud, and these include Notes, Reminders, Emails, Calendar, etc. The steps below help you restore your MAC from the various iCloud services.
1) Start with turning on the Photo Steam or any other data format that you wish to start with. For this article, we shall use image files. Start with tapping on Settings>iCloud>Photo Stream>, ensure that your photo stream is turned on in case it isn’t.
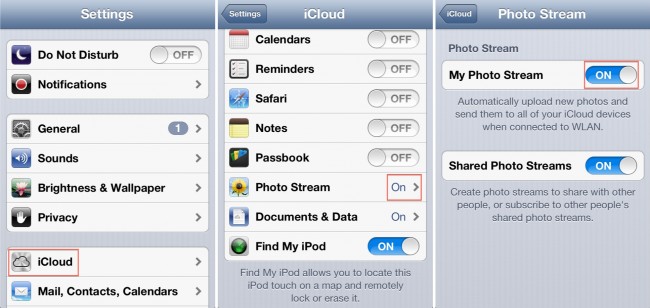
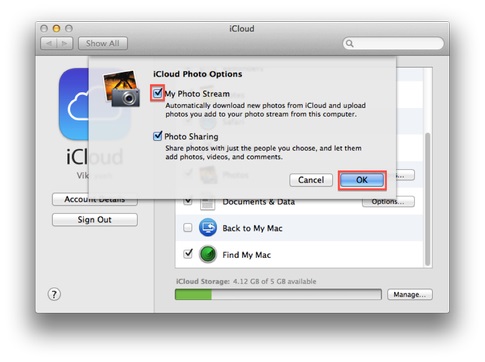
2) We now turn on the Photo Stream on the MAC. From the System Preferences, we open iCloud Control Panel, Select the photos, Click Options, and enable the Photo Stream. Finish by clicking on Ok.
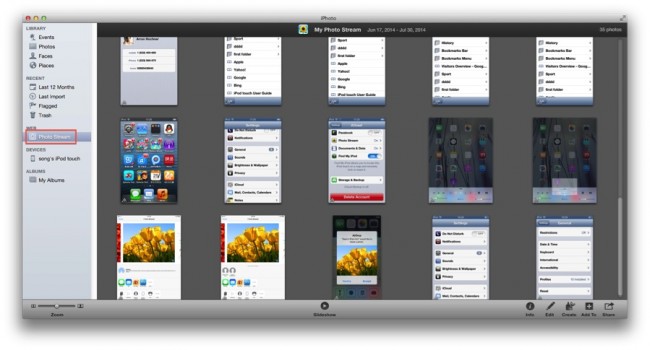
3) Connect the device you used in the first step to your MAC with a USB cable. Now, launch the iPhoto option if it is not running automatically. You then click the photo stream on the left sidebar of iPhoto. The stream photos from iCloud would be presented, and the user is free to edit, delete, or move the files.
Apart from iCloud, the option of Google Drive synchronization is also available to the users. Using Google Drive helps you to synchronize your pictures and other data to the Dropbox, and prevents from permanent deletion.
In the final part, we take a look at Wondershare Data Recovery Software which has been helpful for techies to restore their MAC.
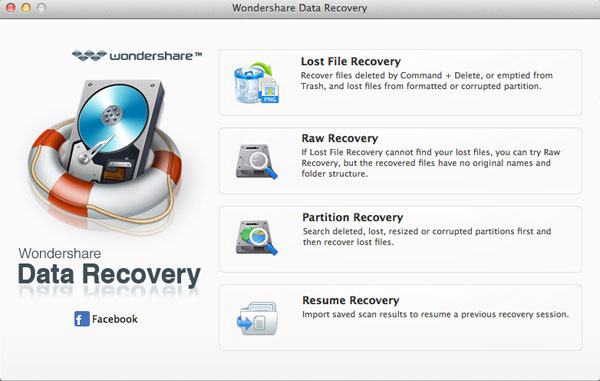
Part 3 How to Restore MAC with Wondershare Data Recovery for MAC
Now, the next issue that we all face is to restore our data after we have successfully manager to restore our MAC systems. While users might be confused between quite a few third-party Mac data recovery applications that promise to achieve this functionality, there are not many that can get the job done. Therefore, we take this section to discuss Wondershares Data Recovery for Mac specially designed for the MAC Users.
- Recover files in 550+ formats from any storage device quickly, safely and completely.
- 3 recovery modes to help you recover lost files in different situations.
- Supports data recovery from USB flash drive, recycle bin, hard drive, memory card, digital camera and camcorders.
- Preview before recovery allows you to do a selective recovery.
- Supported OS: Windows 10/8/7/XP/Vista, Mac OS X (Mac OS X 10.6, 10.7 and 10.8, 10.9, 10.10 Yosemite, 10.11 El Caption and 10.12 Sierra) on iMac, MacBook, Mac Pro etc.
Available for download from the company’s website, this data manager can prove to be quite helpful if you are looking to restore your data the easy way. For the ones looking for tedious and complicated methods, we recommend some other applications.
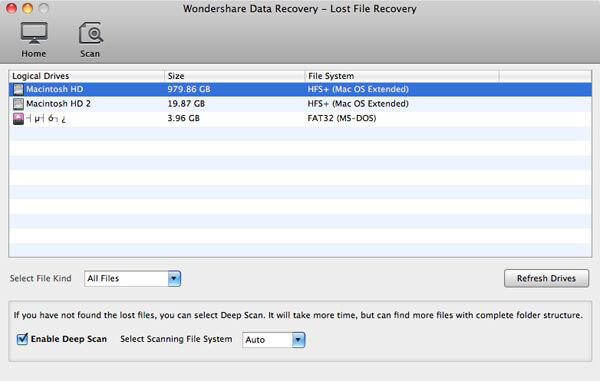
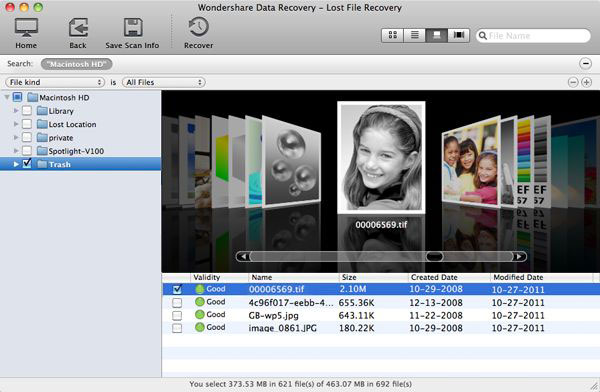
Here are the steps to help you restore your data with Wondershare Data Recovery for MAC:
1) Users are required to start by opting for the required recovery mode. This would depend on how the data you are trying to restore was lost in the first place;
2) Follow this by scanning your device/computer, and then choosing the path/location where the data loss originally occurred. Tap on ‘Start’ to carry forward the process.
3) Selective Recovery is made available to the users. Therefore, simply preview, recover, and save your files.
So, here are the few methods that can help you restore your MAC. For the users are not very well acquainted with technology, Wondershare Data Recovery Software is the best option as the steps can be easily followed through the images. For more advanced users, Wondershare Mac Data Recovery offers multiple customizations that can help users prioritize their data. If you used any of the above methods, let us know your experience in the comments section.