- What is EFI System Partition?
- How to Delete an EFI System Partition
- How to Recover Deleted Data from Partiton Hard Drive
Part-1:What is EFI System Partition?
The EFI System Partition, commonly known by its acronym ESP, is the creation of several regions in a disk drive so that information from each region can be managed separately by the operating system installed in a computer. This is typically used by those computers that adheres to the UEFI or Unified Extensible Firmware Interface.
The ESP contains four main components:
- boot loader programs for the operating system that is currently installed in the computer;
- device driver files for all the hardware devices currently present and utilized by the computer during its boot time;
- system utility programs that start running prior to booting an operating system and;
- data files like error logs.
This specific partition has been developed to ensure that the UEFI firmware will load the operating system and all of the other utilities present in the system as soon as the computer has been booted. The boot loader ensures that all necessary files have already been loaded before the booting sequence has been completed. This system also ensures that all errors encountered by a user which is relevant to a computer’s start up phase will be resolved. For this, a boot loader is an integral part of an operating system that ensures quality start up experience for the user who will be turning on the computer.
How does it Work?
There are different operating systems which are already available nowadays. In relation to these operating systems, there are also different ways on how the EFI System Partition works.
Linux This operating system has two standalone UEFI boot managers. These are GRUB 2 and elilo. Both of them are conventional and full-fledged. Once the firmware loads such managers, both of them can boot and access kernel images from file systems, devices, and partitions supported by the system. It is not limited by the EFI System Partition.
With the EFI Boot Stub, there is a possibility of booting a Linux kernel image without having to use any of the two boot managers stated. The EFI Boot Stub allows a single kernel image to function in any boot environment.
Gummiboot accesses the EFI System Partition. This is a simple boot manager which loads and also runs UEFI images which have already been configured. However, this boot manager does not support or cannot access files that are stored on any other partition or system.
Windows For this operating system, it is strongly recommended that the EFI System Partition should always be the first partition in the disk drive when partitioning one. However, it is not necessary. When creating such partitions on the Windows 64-bit and later editions, the user should run the mountvol /s command to access the EFI System Partition.
Apple-Intel Initially, the EFI System partition on this operating system is not used for booting and is blank. However, for firmware updates, the system is utilized as a staging area. It usually inserts a data file and a firmware flash utility in the computer’s directory. When the system is being rebooted in its flash firmware mode, such updates will run.
Part-2:How to Delete an EFI System Partition
Several users may have difficulties deleting such partition because, at times, the option to remove it is typically grayed out. This is referred to as protective partitioning. In protective partitioning, the Windows Disk Management does not have the capability of deleting such region. Most newbie users would start getting worried about their disk health when encountering such situation.
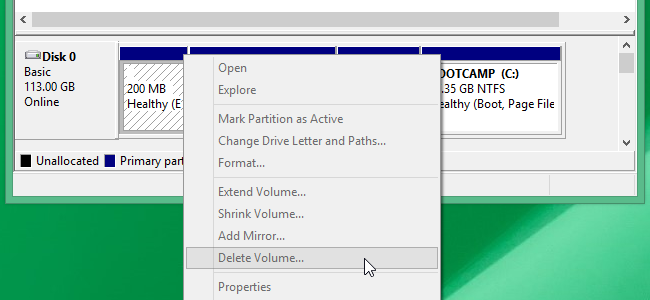
It is actually possible for a user to delete such partition. However, this process is hidden. What a user just needs to do would be to follow the eight steps below so that he can go through and complete the process easily and quickly. After this process, the disk drive will be unpartitioned and a blank space ready for storage of other files.
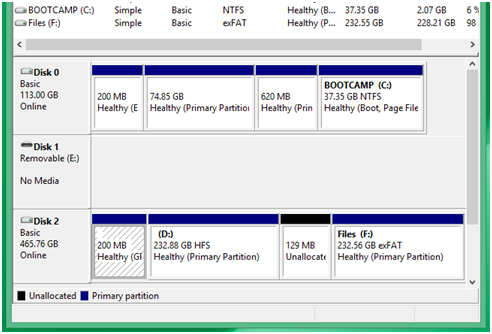
- You have to open the Disk Management Tool first. Although you cannot use the tool in removing the partition, you will need such tool in taking note of the disk number where you will be removing the partition from. There are two steps in opening the tool.
- Windows 8 or 8.1 On the bottom right side of the screen, you can do a right click and select Disk Management from the list that will pop up.
- Any other Windows version You have to press the Windows key + R to open the RUN dialog box. Afterwards, you should type "diskmgmt.msc" and press Enter.
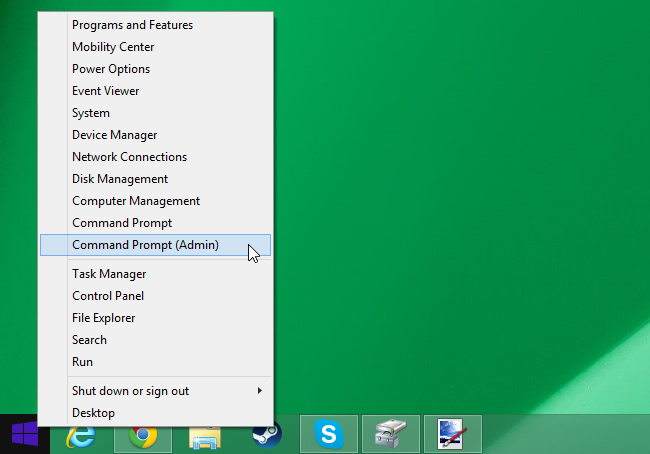
- You need to open the Command Prompt Window as an Administrator.
- Windows 8 or 8.1 You should do a right click on the bottom left corner of the screen and select Command Prompt(Admin).
- Other Windows versions You must look for Command Prompt in the Start Menu. Then, you should do a right click on it, and select Run as Administrator.
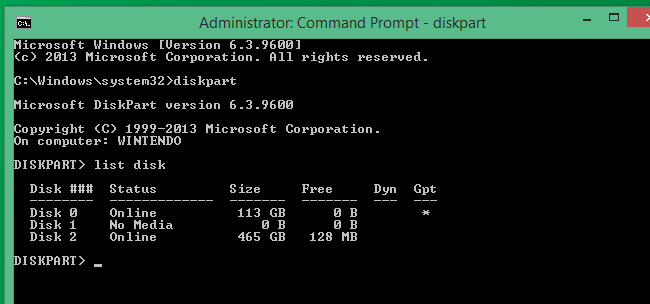
- Once you have opened the Command Prompt black screen, you should type "diskpart" and press Enter afterwards. This command will launch a utility used for advanced disk partitioning tasks.
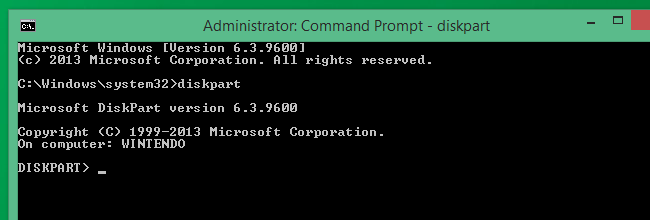
- Next, you should type the command "list disk" for the computer to show all the disks attached to it. This is the part where you have to locate the disk number you took note of in Step 1.
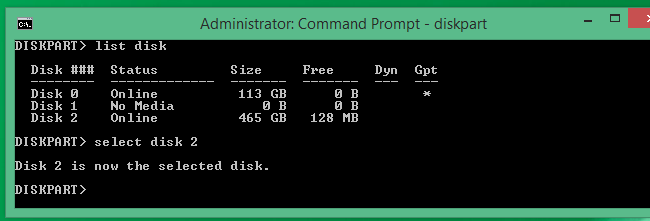
- Afterwards, you should type "select disk #" with the # replaced with the disk number you want to delete and you took note of earlier. You should exercise extreme caution when typing the disk number as you would not definitely want to accidentally wipe out a wrong one.
- Next, you must type "clean" for the system to remove all the files and information on the disk number you have taken note of.
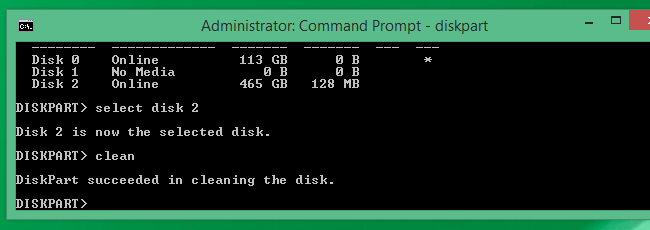
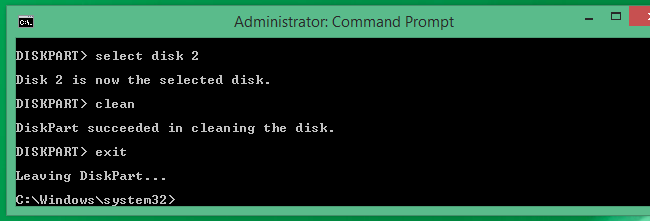
- The cleaning process may take a few seconds or a few minutes. The completion time will depend on the amount of data stored on the partition. Once the process has been completed, you will be notified of its success. You should then type "exit" to close the Command Prompt screen. Your partition has already been removed!
Part-3:How to Recover Lost Data from Partiton Hard Drive
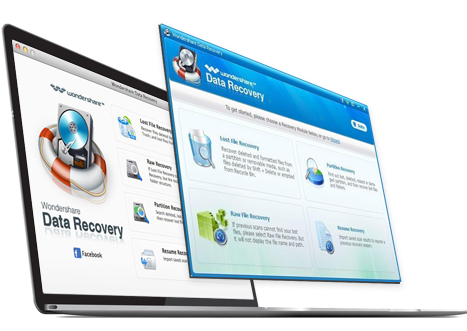
Data lost often happens.There are manay reasons cause data lost from partition hard drive.such as,accidentally deleted,formatted,and virus attack.With Wondershare Data Recovery tool can help you retrieve you lost data back.It is a quite easy and effective hard drive data recovery software. It also supports to recover lost,deleted,formatted data from USB hard drive,flash drive,and other other storage devices.
- Recover files in 550+ formats from any storage device quickly, safely and completely.
- 3 Recovery Modes to help you recover lost files under different situations
- Supports data recovery from recycle bin, hard drive, memory card, flash drive, digital camera and camcorders
- Preview before recovery allows you to make a selective recovery
- Supported OS: Windows 10/8/7/XP/Vista, Mac OS X (Mac OS X 10.6, 10.7 and 10.8, 10.9, 10.10 Yosemite,El Capitan,Sierra) on iMac, MacBook, Mac Pro etc.
Get the specific steps to recover data from parition hard drive.
Partition
- Recover Partition File+
-
- Restore lost Partition
- Recover files from Raw Partition
- Samsung Recovery Partition
- USB Partition Recvoery
- Partition Recovery
- Vista Partition Recvoery
- Recover Deleted Partiton
- Merge Partition
- Clone Partition
- Invalid Partition Table
- Split Partition
- Deleted Partition in Win10
- Create Partition in Win10/MAC
- Restore Partition File
- Mac Partition Recovery
- Merge Partition in Win10
- GPT Partition
- Recover data from formatted partition