Email Archiving is the automated act of capturing, preserving and categorising email traffic received or sent by an individual, organisation or subscribed service. This practice has long been adopted by many organisations - employees find it easier to to retrieve and recover information relayed between business emails, managers find it easier to search for information for annual audits and lawyers find it easier to preserve confidential email conversations that can be used to aid internal investigations and external disputes.
In short, email archiving keeps your inbox clean and easier to manage. It is a wonder why not many people make it a practice to archive their personal emails. While corporate email archives are usually stored on magnetic tapes and disk arrays, most personal email archives are kept in the cloud. Emails are indexed systematically in these archives so that it would be faster to search for a specific information.
There are several things that you can archive along with the email messages. The most important would be email attachments and its associated metadata. Additionally, you can also archive calendars, contacts, notes and instant messages.
Part 1: Why You Need To Keep Your Email Securely Archived And Easily Accessible
There are plenty of reasons why you should perform email archiving at home and work. Here are our top 5 reasons:
- Storage: your email inbox is the hub of your daily business and personal communication - especially now that it is able to sync with many of you digital services e.g. social media account, calendars, contacts, project management manager etc. Archiving can optimise your digital storage space so that you will be able to perform searches on your email inboxes effectively.
- Compliance: finding information in your inbox can be taxing and time-consuming. For some companies, the government requires employees to archive their electronic communication so that they can be retrieved easily when needed in an investigation. Individuals will find this useful when tax filing season rolls by.
- Email Management: automating the storing and indexing process of incoming and outgoing emails will not only save space on your email account but also make your inbox cleaner. It is a great way to categorise conversations relating to a specific project (e.g. Project X) or purpose (e.g. Travel Documents). This way, you will instantly know where to look the specific email at.
- Increase Productivity: by having emails sorted out systematically, you will be able to attend to the important ones first and deal with the least important whenever you are free. Having these emails automatically sorted is also convenient for many people as it reduces the hassle of doing it manually.
- Disaster Recovery: should you accidentally wipe out all of your emails, you can be assured that you can get the important ones back from your email archive. It is a the quickest and easiest way to restore your data.
Part 2: How To Keep Your Email Archiving
Is your Microsoft Outlook suddenly slowed down to an excruciating crawl and a simple email takes a long time to send out? This is probably because your mailbox has become significantly heavier. To check how bloated your mailbox is, all you need to do is go to File > Folder > Properties > Storage - alternatively, right-click any of your folders and click on Properties when the dropdown option appears.
By default, Microsoft Outlook automatically keeps email archiving your Deleted Items, Sent Items, as well as expired Tasks and Calendar items. However, if you receive hundreds of emails daily, you may want to set up email archiving commands to manage your Microsoft Outlook mailbox.
Here are the five steps to set up your Auto Archive's settings:
- Create new local folders to direct new Archived Mail
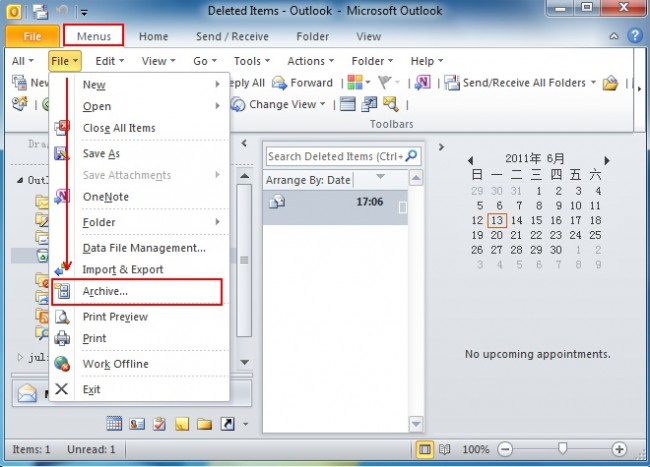
Find On My Computer and right-click on it. Choose New Folder and name it appropriately. If you cannot find this, you may have an older version of Microsoft Outlook - in this case, select File > Archive and change the date under the Archive items older than... option.
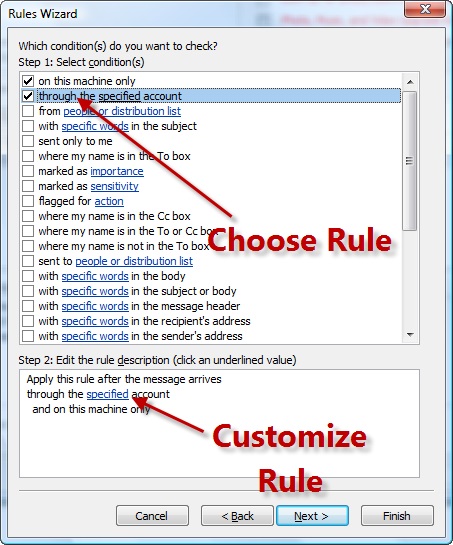
- Create new Archiving Rule
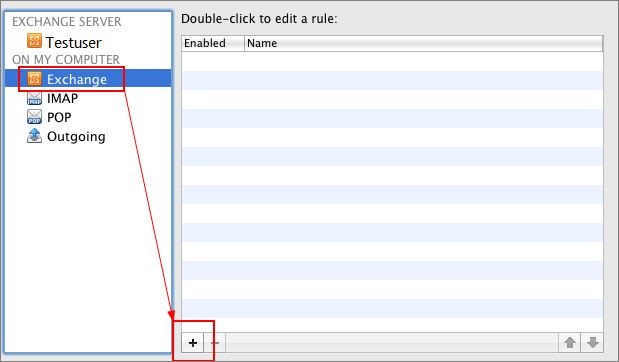
To establish a new rule, click on Tools > Rules and select Exchange from the On My Computer segment. Find the + button at the bottom of the window and click on it. Name the new Archiving Rule appropriately.
- Determine the time period and destination folders
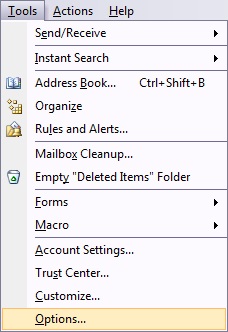
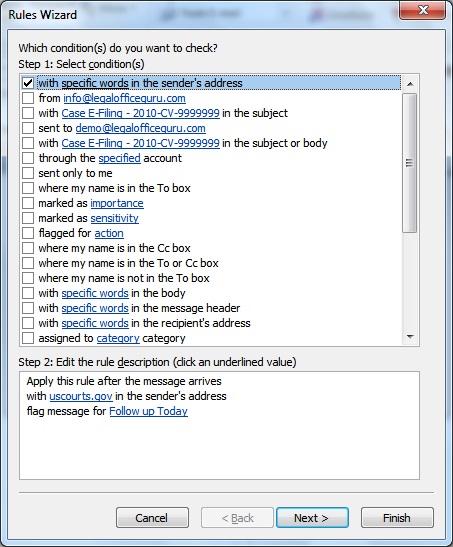
Click the When a new message arrives tab and define the Date Received and Do the Following actions accordingly. Click the Enabled check box and click OK. If you have an older version of Microsoft outlook, go to Tools > Options > Other > Auto Archive to do these changes.
- Apply the new rule on existing email folders
Now that you have set up this new Archiving Rule for new messages, apply it to your old emails as well. To do this, highlight the mail folder and go to Messages > Rules to activate a specific rule.
- Access the archived email messages
You should now be able to notice that there is more storage space on your mailbox. To get to your email archive, just look for them on the left-hand column where the folders are. They should now be under the On My Computer folder.
Part 3: Tips &Tricks For Email Archiving
Here are some tips and tricks to make email archiving work better for you:
- Personalise your filing system. It does not mean if a system works for your friend, it will work for you because there are three types of people in this world: Searchers, Filers and Taggers. Searchers do not do much organising because they believe the search tool is their best friend. People who believes that everything has its specific place are called Filers. Taggers is the love child of both - they put emails in more general files and prefers to search from there.
- Organise your Sent Items so that you can easily find the email that the sender is convinced that you did not sent.
- Make your Archiving Rules work for you. You should now know the pattern of your incoming and outgoing emails - use this knowledge to customise your rules. This will minimise the amount of manual work you will need to do.
- Name your folders as clear as possible. This is so that you do not forget what you have actually asked your email service to sort and archive in each folder.
- Delete unwanted emails as soon as it arrives. Better still, unsubscribe to newsletters that are no longer of an interest to you.
As you can see, organising your electronic mailbox is a piece of cake. Sure, it is a hassle at first to setup your email provider to keep email archiving for you. However, once you have it up and running, it will be super useful and will save you copious amount of time.