Pentru cei cărora le place să rămână conectat la internet on-the-go, nu este posibil să se facă fără Wi-Fi. Disponibilitatea WiFi la spațiile publice, precum și casele noastre ca ne-a ajutat în orice mod posibil. Așa cum am călători în locuri diferite și traversa prin diferite întâlniri, ne simțim nevoia de a transporta sistemul nostru, care conține toată munca noastră. Prin urmare, este important ca sistemul să aibă DHCP operațional, care se poate dovedi a fi utile în timp ce utilizați WiFi în spațiile publice. Înainte de a înțelege cum să dezactivați sau să activați DHCP în sistemul nostru de operare Windows, să ne înțelegem de ce Dynamic Host Configuration Protocol (DHCP sau, așa cum ne vom referi la el în articol), este necesar și ce este vorba?
Partea 1 Ce este DHCP?
DHCP is an essential feature that allows you to connect your system with a WiFi that is configured for public spaces. It happens to be a client-server protocol that automatically provides the user with an Internet Protocol (IP) host along with an IP Address and other relevant configuration information which includes the subnet mask and default gateway. RFCs 2131 and 2132 define DHCP to be an Internet Engineering Task Force (IETF) standard based on the Bootstrap Protocol (BOOTP), as it shares many implementation details with the protocol. DHCP is instrumental in allowing hosts to obtain necessary TCP/IP configuration information from a DHCP Server with ease.
Since we are considering Windows in the given article, we must consider the Microsoft Windows Server 2003 Operating System that includes the DHCP Server Service, and happens to be an optional networking component. Please note that all Windows-based clients include the DHCP client as a part of the TCP/IP, including Windows Server 2003, Microsoft Windows XP, Windows 2000, Windows NT 4.0, Windows Millennium Edition (Windows Me), and also Windows 98. Clearly, the new versions of Windows that include Window 7, 8, and 10 come with the functionality of DHCP. In the following section, we shall undertake the procedure to enable DHCP on our systems.
Part 2 How to have DHCP Enabled on Windows System?
In the following section, we shall list out the steps that can help you enable DHCP on Windows 10 with ease. Contrary to the earlier variants of Windows, the process has been made fairly simple in the latest offering of Windows.
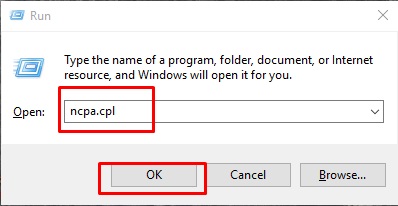
1) To have the DHCP enabled, tap the combination of Windows key+ R on the desktop screen which starts the ‘Run’ command box. Once the command box is displayed, type ‘ncpa.cpl’, and this will direct you to the network and sharing window.
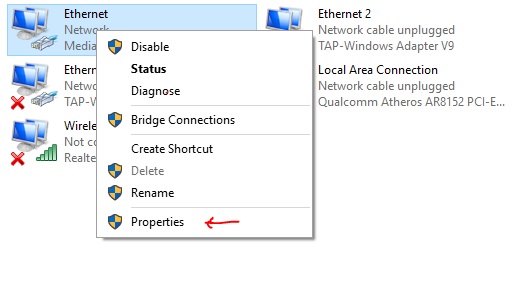
2) Once you are inside the Network and Sharing Window, simply right-click on the icon that says ‘Ethernet’ and click on Properties. If you are prompted by UAC, simply click on ‘Yes’.
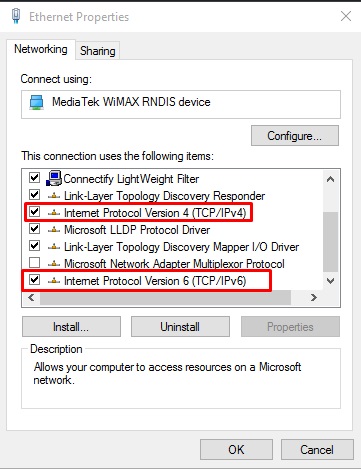
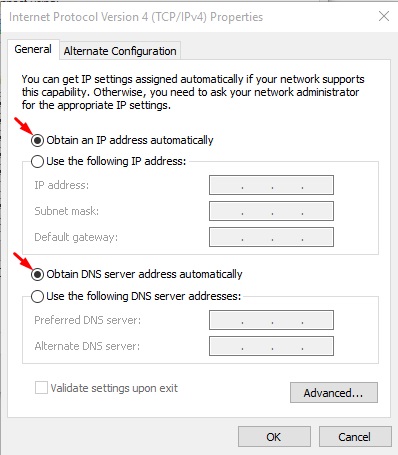
4) Follow the above process by the double clicking on the Internet Protocol Version 4 (TCP/IPv4) and check the following boxes to have DHCP enabled, ‘Obtain an IP Address automatically’, and ‘Obtain DNS Server Address Automatically’, and once you have completed the process, tap ‘Ok’.
 5)
5)
For the ones opting for Internet Protocol Version 6 (TCP/IPv6), you must follow the above steps and then close the window to have the DHCP enabled.
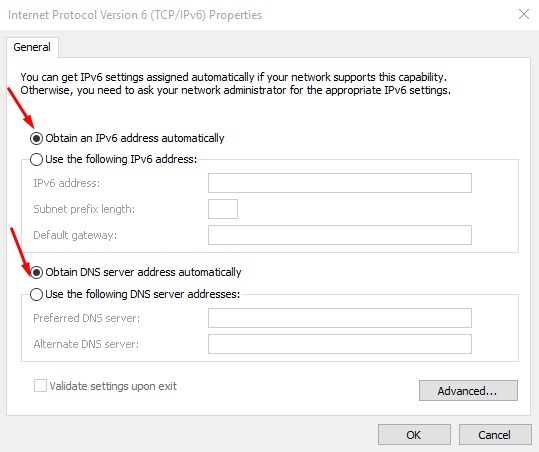
Here is an important note for our users to have DHCP enabled; whenever you are making the above listed changes to your system, ensure that the broadband router being put to use can support DHCP. There are some routers that come with a control panel where you need to have DHCP enabled, but the ones being used these days are having DHCP enabled by default.
Part 3 How to Disable DHCP in Windows Operating System?
In the following section, we shall take a look on the procedure that helps us reverse the order of DHCP enabled, which is to disable DHCP.
1) Again, go the desktop screen of your system, and tap the Windows+ X key combination in order to access the Power User Menu.
2) Tap the ‘Network Connections’ Option that is listed there.
3) If you have DHCP enabled on your system, you should be seeing two types of network connections, which are Ethernet and WiFi. Simply double-click the active network connection.
4) Once you are on the network connection status window, click on the ‘Properties’ button.
5) The next step has you clicking on the Internet Protocol Version 4 option and tapping the Properties Button. Users must note that similar steps could be required to be performed on IPv6 as well.
6) To reverse the status of DHCP enabled, which is to disable it, we enter the Network Settings, and select the ‘Use the following IP address’ option, and then enter the values for the IP Address, subnet mask, and default gateway. Also, finish the process to reverse DHCP enabled by tapping the ‘Use the following DNS Server Address’ option and entering a value for your preferred DNS server. Users are free to enter a value for any corresponding DNS Server as they wish to.
As we learnt through the above methodologies, to have DHCP enabled is critical for using your internet on-the-go, and if you wish to disable it in order to secure your information over a public space, disable it using the above listed steps with ease.


