A partition hard drive refers to a distinct storage space on a hard drive. It is a tiny portion of a large hard drive. Essentially, a partition is only a logical division from the whole drive. Drive partitioning is easy to do now that many Operating Systems allow it. You can divide your hard drive as you wish. If you want to run more than one Operating Systems, you can create two or more partitions. The OS will recognize the partitions you have made as separate hard drives, even though they are just a small fraction of a whole hard drive. When you partition your drive several times, you can avoid doing multiple hard drive installations just to be able to boot to a different Operating System.
- Part 1: Why you need Partition Hard Drive
- Part 2: How to partition hard drive in windows
- Part 3: How to Partition Hard Drive with PowerSuite
Part 1: Why you need Partition Hard Drive
One of the main reasons why a computer user may split their hard disk drive into several partitions is so that they can organize their data more effectively. For instance, a Windows PC user may decide to keep their OS and applications on a single hard disk partition and the user data on the next hard disk partition. This can be so beneficial should a problem attack your Microsoft Windows software. You can format the OS partition and reinstall it without affecting your data partition.
Another reason why one may partition their drive is so they can achieve smaller partitions with tinier cluster sizes. A cluster size can be described as the tiniest piece of data that a partition can cache. Having a smaller disk partition with a smaller cluster size is helpful because you can squeeze a file that could require up to 16KB of storage space (in a large partition) in a 4KB storage space. This is a nice way to store a big number of small files.
It is extremely imperative to make the hard drive available to an OS. But what if the hard drive is larger than the partition size allowed by the operating system? The best way out is to split your large hard disk into several partitions. When a whole family or group of people have to share a computer, the only way to ensure that they keep files separately without affecting how they share them is to create many disk partitions.
Part 2: How to partition hard drive in windows
The partition hard drive in Windows is rather easy to create. You can do it even without enough computer knowledge, thanks to the high level of technology owned by Microsoft. The tips provided below are meant for users of Windows 10, Windows 8, Windows 7, Windows Vista and Windows XP. The following are easy steps you should follow:
1. Open Disk Management
This tool is incorporated in all Window versions that allow the user to partition their hard drive. If you are using Windows 8/8.1 or Windows 10, use Power User Menu to open Disk Management.
As soon as the Disk Management starts, an Initialize Disk window will emerge showing this text: You must initialize a disk before Logical Disk Manager can access it.
Hint: If this window doesn’t show up, don’t bother, go to step 4.
Note: However, if you use Windows XP, you will instead notice an Initialize an Convert Disk Wizard screen. So, follow the wizard and don’t click the Convert disk option unless you have to. Go to step 4 when you finish.
2. Locate the hard drive to partition.
This can be picked from the drive map shown at the bottom of your Disk Management window.
Hint: Maximize Disk Management or Computer Management to view all the available drives. Any drive without partitioning will be absent in the drive list at the top of your window.
Note: A new drive will appear as unallocated on a dedicated row named Disk I. However, if the drive you intend to partition is a component of an existing drive, the term unallocated will appear close to the available partitions.
Vital: If you cannot view the drive you wish to partition, you might have installed it wrongly. Shut down your PC and check if your hard drive is well installed.
3. Choose Simple Volume
Tap and hold or right-click anywhere on the drive you wish to partition. Then choose New Simple Volume. If partitioning Windows XP, the option is known as New Partition.
4. Click Next
When the New Simple Volume Wizard window appears, click Next. In Windows XP, the Select Partition Type screen will show up next. Then you will need to select Primary partition. There is an Extended partition too that is only useful when creating more than 5 partitions on one hard drive. Click Next after finishing.
5. Specify Volume Size
Click Next on the Specify Volume Size stage to verify the size of the drive you want to create. Note: The default size in Simple Volume Size in MB: field should be similar to the amount shown in the Maximum disk space in MB: field. Hence, you will create a space equal to the whole space on the physical hard drive.
Tip: Make as many multiple partitions as you wish, determining the size for each.
6. Assign Drive Letter or Path
Click Next on this: Assign Drive Letter or Path. But do this if the default drive letter you view is fine with you.
Note: Windows will automatically assign the first accessible drive letter, but will skip A and B— on most PCs these appear as D or E. Assign the following drive letter to the available option. This letter can be altered later on.
7. Do not format this volume
Next, pick Do not format this volume on the Format partition step. Then, click Next.
Note: You may format your drive at this point if you understand what is going on.
8. Confirm your choices after completing the New Simple Volume Wizard screen.
Results may vary based on the type of hard disk and computer you use.
9. Now click the Finish button. Windows will partition the drive in a few seconds. The partitioning process ends when you see the new drive letter emerge in the listing at the top of DM (Disk Management).
10. Windows attempts to open the new drive
These messages will appear: You need to format the disk in Drive D before you can use it. Do you want to format it? Note that Drive D will be the letter you chose above. This drive D appears as an example. However, the messages don’t appear in older versions— Windows Vista and Windows XP.
11. Click Cancel and go to the next step
You may format your drive if you are familiar with the process. Just click Format disk
12. Continue to our Format a hard drive tutorial.
Part 3: How to Partition Hard Drive with PowerSuite
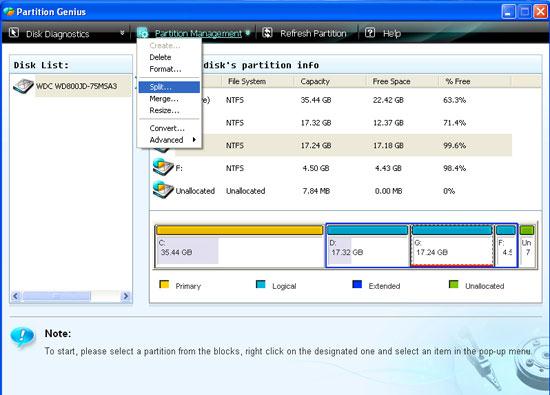
Actually, to partition a new, blank disk is quite easily, while to one with lots of data, attention should be paid for the data loss. If you want extensive partitioning options, you can use Wondershare PowerSuite 2012, which can help you create, resize and merge partitions, as well as format partitions, convert the file systems and hide some partition for privacy and security concerns. Hit and go to "Start Partition Genius" now!

Before your hard disk partition
Your data is the most valuable part of your machine. Although it is unlikely that this partition hard drive software would damage your data, other system failures, such as hardware, software, or power, can put your data at risk if they occur during partition operations. So you'd better backup your disk at first, and you don't need any other tool at all, this hard dirve partition manager also can help you to clone the entire disk for backup.
Step 1: Select a partition for splitting
Select the designated partition from the block you are going to split. Hit "Partition Management" on the top, and choose "Split". Or you can right click the designated partition, and you also can get the partition management menu.
Step 2: Set the size of new partition
On the pop-up window of split partition, you can set the size of new partition by adjusting the percentage of the space left on the existing partition. Here you can adjust the free space, and the used space will be counted automatically. Then hit "OK" to begin hard drive partition.
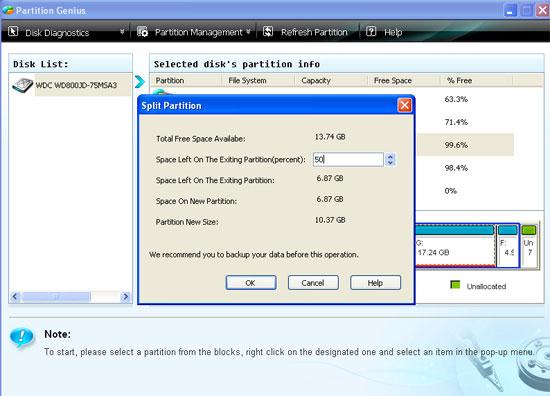
Note: If you have backed up the hard disk and want to split it more flexibly, you can wipe the disk to make it a blank one. Then you can split it as you like.
Step3. Hard Drive Partition Finished
On the process bar, you can check the splitting progress, and a pop-up window will tell you when the splitting has been completed successfully. You only need to click "OK" to finish the whole work. And the hard disk partition is done!
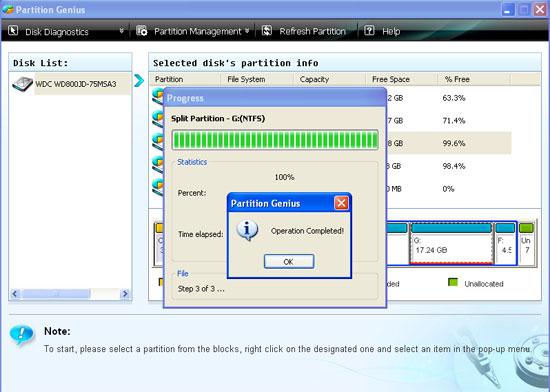
Now refresh partitions by clicking the "Refresh Partition" on the top of the interface, and you will see the new partition is listed in the panel. Or you also can check the new partition by hitting "My Computer" icon on your desktop of the computer.
You can delete, merge and resize the partition on your computer with this disk partition manager. Additionally, Wondershare PowerSuite 2012 also allows you to back up files, recover data, speed up your computer and more.
Hard Drive Data Recovery Software for Partition Failure
There is always the situation happening that hard drive partition failure and you lost all important files from hard disk or just missing.Wondershare data recovery can help you solve this issue.It is a safe and effective data recovery software, retrieves your lost videos, photos, music, documents, emails, etc. from your PC's hard drive as well as from USB drives, external hard drives, and other storage devices.
Mwakhama Drive Kusangalala
- Yamba Data ku osiyana Mitundu Mwakhama Drive +
- Kukonza litayamba anu +
-
- Mwakhama litayamba kukonzedwa
- Mwakhama litayamba mirroring
- Pukutani chosungira
- Kufufuta chosungira
- Kukonza chosungira
- Kukonza Boma zoipa
- Yamba kafukufuku pagalimoto inaonongeka molimba
- Unformat chosungira
- Gwiritsani chosungira kuchira kugawa
- Local chosungira utumiki kuchira
- Litayamba kukonza mapulogalamu
- Yamba kunja zovuta galimoto +
-
- Kunja zovuta galimoto kuchira
- Seagate kunja zovuta galimoto kuchira
- WD Zowonekera kunja chosungira file kuchira
- Freecom kunja zovuta galimoto kuchira
- Buffalo kunja zovuta galimoto kuchira
- G-Technology kunja zovuta rrive kuchira
- Fantom kunja chosungira deta kuchira
- Yamba owona ku inaonongeka galimoto kunja zovuta
- Yamba kafukufuku chosungira / mbale +
-
- Linux molimba pagalimoto kuchira
- Laputopu deta kuchira
- kugawa kuchira
- Seagate Kukula deta kuchira
- WD wanga pasipoti kuchira
- Lacie dard litayamba deta kuchira
- WD mchitidwe deta kuchira
- Dell deta chosungira kuchira
- Acomdata molimba deta kuchira pagalimoto
- Fujitsu deta chosungira kuchira
- Iomega mbale molimba kuchira
- Toshiba Change Data Kusangalala
- Micronet deta kuchira
- Yamba deta ku zipangizo zosiyanasiyana +
-
- Rocster deta kuchira
- Buslink deta kuchira
- Chofunika M4 deta kuchira
- Kalvare deta chosungira kuchira
- Simpletech deta chosungira kuchira
- Kingston SSD kuchira
- Apricorn Aegis deta kuchira
- HP molimba litayamba deta kuchira
- Maxtor deta chosungira kuchira
- Hitachi deta chosungira kuchira
- Toshiba deta chosungira kuchira
- Panasonic deta chosungira kuchira
- Sungani litayamba anu +
-
- Choyerekeza chosungira
- Sinthanitsani chosungira
- Kugawa kunja chosungira
- Zida kuchira molimba pagalimoto
- Top molimba pagalimoto kuchira mapulogalamu
- Kuchita SSD Kusangalala mosatekeseka
- Molimba pagalimoto achinsinsi kuchira
- Amasamukira Os kuti galimoto latsopano molimba
- Molimba pagalimoto diagnostics
- Mwakhama kugawa litayamba
- Yamba kafukufuku Mac Os +
- Mavuto ndi chosungira +