- How to Wipe Hard Drive under Windows
- How to Erase Hard Drive on Mac
- Hard Drive Data Recovery Software
Looking to sell your Windows PC or Mac to another person? Whether it be the need to buy a new device or just for the money, you will do good to remove all previous and existing data from your system. This prevents misuse of the data.
Even if you’re not selling your laptop, it is a wise thing to wipe or erase data on a regular basis to keep your computer working at optimum performance. When virus or another software related problem occurs on your computer, erasing the data will be a great idea. Here are the scenarios when you can wipe or erase the data:
- Some times, when you have accumulated lots of data on your computer, it gets sluggish and performance is reduced to great degree. Wiping or erasing data can make your computer faster.
- When virus infects your computer, the only option left for you is to erase hard drive data from the computer. This will leave your hard disk as it was new.
- For regular maintenance of health of your hard disk. Wiping or erasing the disk will solve lot of fragmentation and many other issues.
- If you are looking to merge or create new partition, it might require you to delete some partition on your computer. This will require you to erase hard drive from the computer.
- In case you are installing new OS on your computer, you will have to erase the old OS and install new. Hence, you will have to wipe the old data from hard drive, to make way for fresh installation.
There are many more reason for wipe hard drive. There are few way you can erase hard drive both on Windows and Mac. There are many third party software that you can use to erase hard drive data but nothing is as reliable as the OS itself.
How to Wipe Hard Drive under Windows?
Windows gives good options when it comes to erasing data from your windows computer. However, you must always back up your data before you erase hard drive data from your computer. You can always use third party software but windows gives you more secure way of wiping data. You can use either old installation disk or new OS installation disk to erase the data from your computer.
You can use the following steps to wipe or erase hard drive data on your Windows computer. You will require back up CD or your windows CD to wipe the data.
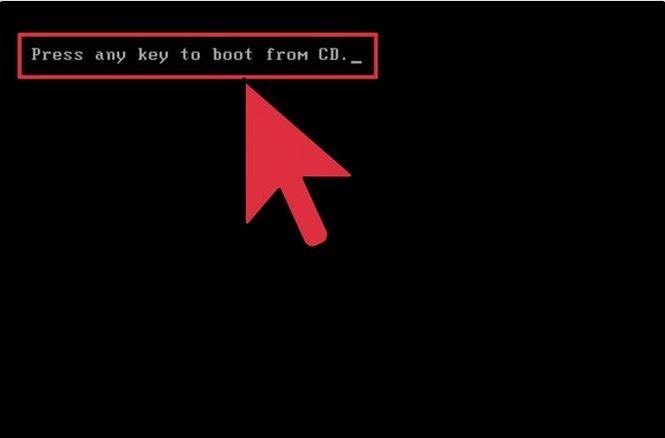
- Insert the CD in the computer and restart your computer. One the booting starts you will see a function button for entering into boot option. Press that button continuous when computer starts and enter into the boot option and choose CD-rom.
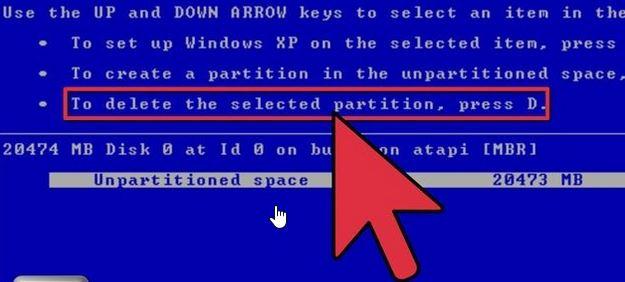
- It will start again and boot from the CD-Rom. On next screen you will see various set up options. And also there will the list of the disks on your computer. Select the disk you want to erase and then go to option to Delete The Selected Partition. In case there are more than one partition, you can choose the other also to delete it.
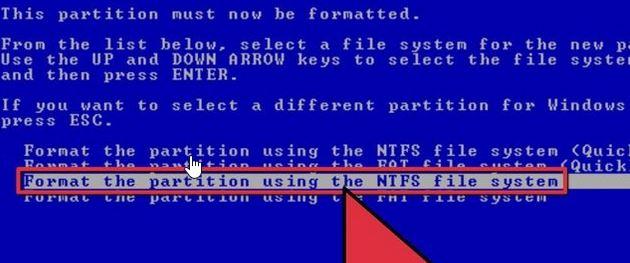
- Now choose the NTFS option for drive and choose the formatting option quick or normal.
It will automatically format your disk and it will restart again. Make sure there is an operating system on your computer and boots from that drive. Few options may change from OS to OS but the steps will remain same while erasing the data. You reinstall new OS or use the existing one to access your formatted computer.
How to Erase Hard Drive on Mac?
Erasing or wiping data on Mac is similar but options and steps are little different as it is different OS. However, Mac also gives you inbuilt options from erasing data from your Mac computer. Like in windows, use the back up option first to save your important data. You do not want lose this data because it might become impossible to recover data after it has been erased from the computer.
Here are the steps you can follow to wipe or erase hard drive data from Mac.You will require installation disk of the OS to perform this wipe.
- Insert the disc into your mac and restart it. When the computer restarts keep C pressed until the logo of Apple appears.
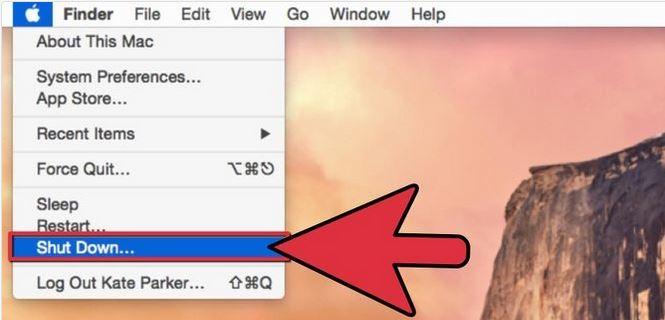
- When the new screens pops, select the appropriate selection. In order to erase select Macintosh HD volume and go to option button at the bottom. Choose to erase and install clean OS of the operating system.
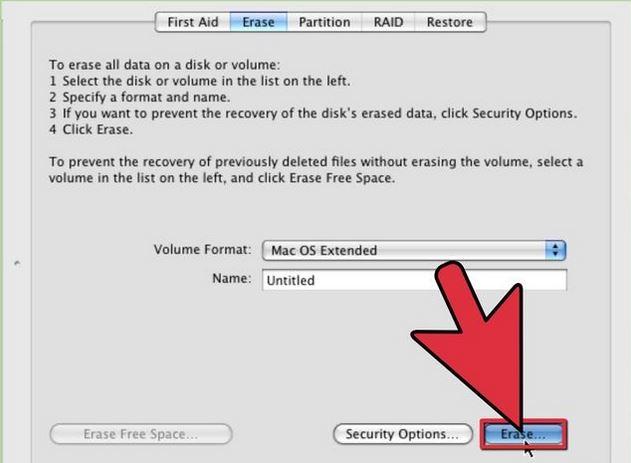
This is the best and easiest way to delete hard disk data on Mac. After the process, your computer will be restarted and it will be fresh installation hence, you will have to restore you original data on your computer from the backup. However, you will require administrative permission before you make this change. Hence, enable the Root user to allow you to make this change.
Both methods are simple and easy to follow. Make sure you have back up your data and use the original installation OS disks to make the process smooth.
Hard Drive Data Recovery Software
Here We recommend a powerful Hard Drive Data Recovery Software for you.Wondershare Data Recovery and Wondershare Data Recovery for Mac is a safe and effective hard drive data recovery software. It supports to recover lost data from hard drive,flash dirve,external hard drive and any other storage devices.

- Recover lost or deleted files, photos, audio, music, emails from any storage device effectively, safely and completely.
- Supports data recovery from recycle bin, hard drive, memory card, flash drive, digital camera and camcorders.
- Supports to recover data for sudden deletion, formatting, hard drive corruption, virus attack, system crash under different situations.
- Preview before recovery allows you to make a selective recovery.
- Supported OS: Windows 10/8/7/XP/Vista, Mac OS X (Mac OS X 10.6, 10.7 and 10.8, 10.9, 10.10 Yosemite, 10.10, 10.11 El Capitan, 10.12 Sierra) on iMac, MacBook, Mac Pro etc.
Mwakhama Drive Kusangalala
- Yamba Data ku osiyana Mitundu Mwakhama Drive +
- Kukonza litayamba anu +
-
- Mwakhama litayamba kukonzedwa
- Mwakhama litayamba mirroring
- Pukutani chosungira
- Kufufuta chosungira
- Kukonza chosungira
- Kukonza Boma zoipa
- Yamba kafukufuku pagalimoto inaonongeka molimba
- Unformat chosungira
- Gwiritsani chosungira kuchira kugawa
- Local chosungira utumiki kuchira
- Litayamba kukonza mapulogalamu
- Yamba kunja zovuta galimoto +
-
- Kunja zovuta galimoto kuchira
- Seagate kunja zovuta galimoto kuchira
- WD Zowonekera kunja chosungira file kuchira
- Freecom kunja zovuta galimoto kuchira
- Buffalo kunja zovuta galimoto kuchira
- G-Technology kunja zovuta rrive kuchira
- Fantom kunja chosungira deta kuchira
- Yamba owona ku inaonongeka galimoto kunja zovuta
- Yamba kafukufuku chosungira / mbale +
-
- Linux molimba pagalimoto kuchira
- Laputopu deta kuchira
- kugawa kuchira
- Seagate Kukula deta kuchira
- WD wanga pasipoti kuchira
- Lacie dard litayamba deta kuchira
- WD mchitidwe deta kuchira
- Dell deta chosungira kuchira
- Acomdata molimba deta kuchira pagalimoto
- Fujitsu deta chosungira kuchira
- Iomega mbale molimba kuchira
- Toshiba Change Data Kusangalala
- Micronet deta kuchira
- Yamba deta ku zipangizo zosiyanasiyana +
-
- Rocster deta kuchira
- Buslink deta kuchira
- Chofunika M4 deta kuchira
- Kalvare deta chosungira kuchira
- Simpletech deta chosungira kuchira
- Kingston SSD kuchira
- Apricorn Aegis deta kuchira
- HP molimba litayamba deta kuchira
- Maxtor deta chosungira kuchira
- Hitachi deta chosungira kuchira
- Toshiba deta chosungira kuchira
- Panasonic deta chosungira kuchira
- Sungani litayamba anu +
-
- Choyerekeza chosungira
- Sinthanitsani chosungira
- Kugawa kunja chosungira
- Zida kuchira molimba pagalimoto
- Top molimba pagalimoto kuchira mapulogalamu
- Kuchita SSD Kusangalala mosatekeseka
- Molimba pagalimoto achinsinsi kuchira
- Amasamukira Os kuti galimoto latsopano molimba
- Molimba pagalimoto diagnostics
- Mwakhama kugawa litayamba
- Yamba kafukufuku Mac Os +
- Mavuto ndi chosungira +