The recovery hd, is a hard drive partition on the hard drive in a Mac. It can be accessed by rebooting the Mac and then pressing down the Command+R keys. Mac OS X Lion and above include the Recovery feature which can be used to reinstall the operating system, repair the hard disk or restore the system from a backup. To enter the recovery mode, press command+r key when the system reboots, keep holding them down until the Apple logo appears. The recovery mode has a desktop with an OS X menu bar and an OS X Utilities window with the options listed above. You can then choose your desired option from the utilities window or the utilities menu depending upon your requirement.
- Part1: What recovery hd could help you to do
- Part2: How to Restore Mac using Recovery HD
- Part3: How to Troubleshoot Recovery HD Problems
- Part4: Mac Data Recovery Software
Part1: What recovery hd could help you to do
As mentioned earlier, the recovery hd contains essential diagnostic and troubleshooting tools which aid the user in fixing his Mac if anything goes wrong. The Recovery HD has the following features:
1. Restore Mac from Time Machine
Time Machine is a unique backup feature in the OS X. Time Machine keep a track of how your Mac looked on a particular day and uses that information to restore Mac to any desired day in the past. Time Machine keeps backup of a day, a week and even a month but when the backup drive becomes full, the oldest backup is deleted to make more space for the new backups.
2. Repair Hard drive
Disk utility is one of the main options offered in the recovery mode. This feature can be used to repair the hard drive of your Mac once you select the “Repair Disk” option. recovery hd will also let you search for troubleshooting info over the internet as well as remove the contents of the hard drive and restore it from a Time Machine back up.

3. Install/uninstall Mac OS X
This is also a great feature provided by the recovery hd. Using this feature you can download your desired version of the OS X over the internet without requiring any kind of optical disk. But obviously, for this method to work, you need to be connected to the internet.

Part2: How to Restore Mac using Recovery HD
To restore Mac using recovery hd, follow these steps:
- To get access to the Recovery HD volume, restart your Mac while pressing the Command and R keys until the Apple logo appears.
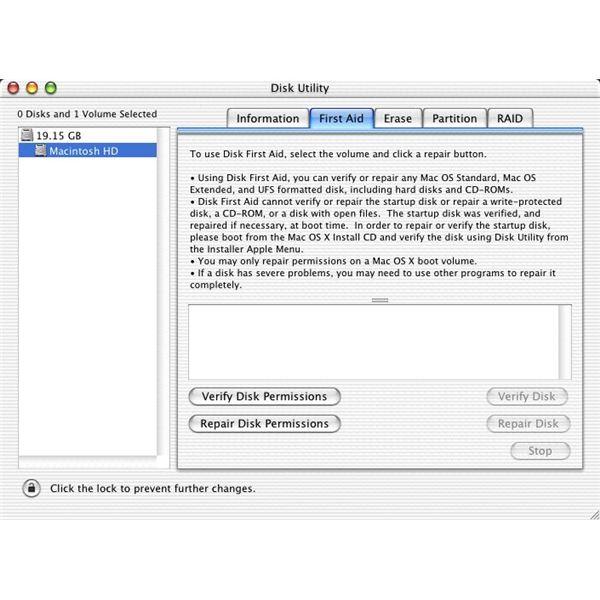
- You will see only a very basic OS X interface with OS X Utilities window. Select Disk Utility from this window and hit “Continue”.

- From the Disk Utility window, select the First Aid tab and then click the icon of your boot hard drive. If your boot hard drive is Recovery for instance, click on the hard drive marked Recovery and select “Repair Disk”.
- It will take a little time for your Mac to get all the diagnostic and troubleshooting procedures going but after a little while you will notice the appearance of a window telling you that the drive has been repaired.
- Quit Disk Utility by choosing Disk Utility→Quit Disk Utility, by pressing Command+Q, or by clicking the red Close Window gumdrop then reboot the system and return to your work.
Part3: How to Troubleshoot Recovery HD Problems
Recovery HD’s aim is to help users get the most out of the troubleshooting provided by OS X but what of you cannot find the Recovery HD itself or the recovery hd itself is presenting problems? Well, one thing that you shouldn’t really be doing is panicking. This article takes into account some common problems with recovery hd itself and tells you how to take care of them in the following lines.
1. Recovery HD is Locked
Recovery HD can get locked sometimes which is indicated by the appearance of an error message that says, “Hard Drive locked”. To get rid of this problem, simply go to disk utility, click on the hard drive then click 'enable journaling' to unlock the drive.
2. Recovery HD doesn`t Show up
Recovery HD does not show up if you have formatted your entire hard drive. To bring it back, you will need to have a Time Machine backup of the data from your hard drive before the formatting happened. Restoring the OS from that backup will get you your OS back while to get the Recovery HD back you will need to run a minimal install of your OS using a setup from the internet or a disk. It will bring back the recovery hd to your Mac.
Part4: Mac Data Recovery Software
We recommend a Mac data recovery software for you ,once you did not backup data from hard drive before you restore Max os x. Wondershare Data Recovery for Mac,4 Modes to recover lost or deleted files from Mac quickly, safely and thoroughly. It supports recover lost,deleted,formatted data from Mac hard drive as well as from USB drives, external hard drives, and other storage devices.

Your Safe & Reliable Mac Data Recovery Software
Easily and flexibly recover deleted or lost data from Mac Trash.
- Recover lost or deleted files, photos, audio, music, emails from any storage device effectively, safely and completely.
- Supports data recovery from recycle bin, hard drive, memory card, flash drive, digital camera and camcorders.
- Supports to recover data for sudden deletion, formatting, hard drive corruption, virus attack, system crash under different situations.

Deleted File Recovery
Accidentally deleted important files without any backup and empty the "Mac trash"? Recover deleted files from MAC/Laptop/Server and other storage media easily and quickly.

Partition Recovery
Data loss for deleting or formatting partition mistakenly? Recover data stored on partitions that have been deleted or formatted,and even from lost or hidden partitions.

RAW Hard Drive Recovery
Restore inaccessible, hidden or severely corrupt data that is usually caused by file system damage, RAW hard drive, RAW partition or partition loss with this powerful data recovery software.
Mwakhama Drive Kusangalala
- Yamba Data ku osiyana Mitundu Mwakhama Drive +
- Kukonza litayamba anu +
-
- Mwakhama litayamba kukonzedwa
- Mwakhama litayamba mirroring
- Pukutani chosungira
- Kufufuta chosungira
- Kukonza chosungira
- Kukonza Boma zoipa
- Yamba kafukufuku pagalimoto inaonongeka molimba
- Unformat chosungira
- Gwiritsani chosungira kuchira kugawa
- Local chosungira utumiki kuchira
- Litayamba kukonza mapulogalamu
- Yamba kunja zovuta galimoto +
-
- Kunja zovuta galimoto kuchira
- Seagate kunja zovuta galimoto kuchira
- WD Zowonekera kunja chosungira file kuchira
- Freecom kunja zovuta galimoto kuchira
- Buffalo kunja zovuta galimoto kuchira
- G-Technology kunja zovuta rrive kuchira
- Fantom kunja chosungira deta kuchira
- Yamba owona ku inaonongeka galimoto kunja zovuta
- Yamba kafukufuku chosungira / mbale +
-
- Linux molimba pagalimoto kuchira
- Laputopu deta kuchira
- kugawa kuchira
- Seagate Kukula deta kuchira
- WD wanga pasipoti kuchira
- Lacie dard litayamba deta kuchira
- WD mchitidwe deta kuchira
- Dell deta chosungira kuchira
- Acomdata molimba deta kuchira pagalimoto
- Fujitsu deta chosungira kuchira
- Iomega mbale molimba kuchira
- Toshiba Change Data Kusangalala
- Micronet deta kuchira
- Yamba deta ku zipangizo zosiyanasiyana +
-
- Rocster deta kuchira
- Buslink deta kuchira
- Chofunika M4 deta kuchira
- Kalvare deta chosungira kuchira
- Simpletech deta chosungira kuchira
- Kingston SSD kuchira
- Apricorn Aegis deta kuchira
- HP molimba litayamba deta kuchira
- Maxtor deta chosungira kuchira
- Hitachi deta chosungira kuchira
- Toshiba deta chosungira kuchira
- Panasonic deta chosungira kuchira
- Sungani litayamba anu +
-
- Choyerekeza chosungira
- Sinthanitsani chosungira
- Kugawa kunja chosungira
- Zida kuchira molimba pagalimoto
- Top molimba pagalimoto kuchira mapulogalamu
- Kuchita SSD Kusangalala mosatekeseka
- Molimba pagalimoto achinsinsi kuchira
- Amasamukira Os kuti galimoto latsopano molimba
- Molimba pagalimoto diagnostics
- Mwakhama kugawa litayamba
- Yamba kafukufuku Mac Os +
- Mavuto ndi chosungira +